
Understanding Snowflake’s Costing and Pricing Model
16 April 2023
Upgrading Your Business for the Future
18 June 2023
Tags

Published by
BluePi
Data-Driven Business Transformation
AWS Sagemaker Studio Resource Isolation & Authentication via Azure AD
Background
Objective
Federated authentication to Sagemaker Studio through Azure AD by implementing SSO with resource isolation.

Solution
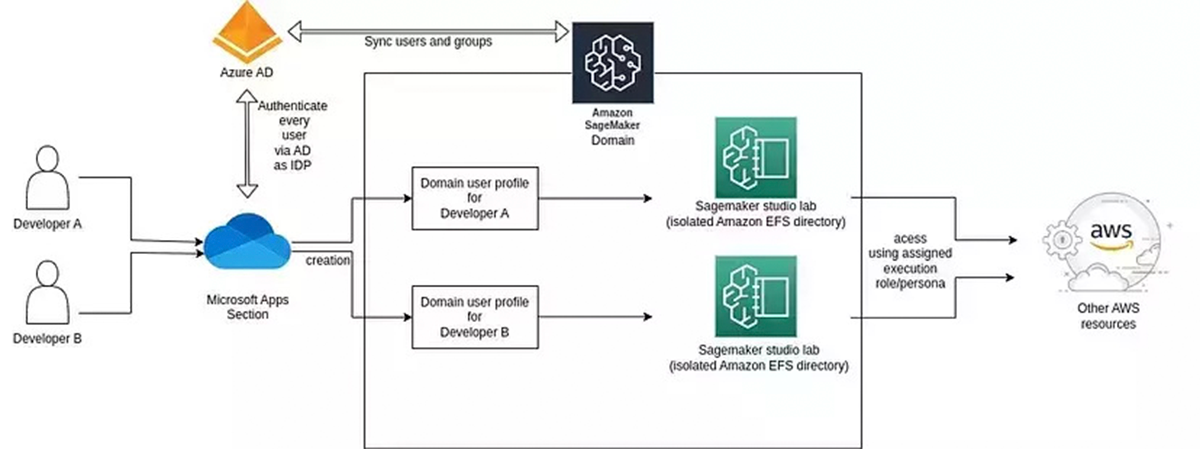
Azure Active Directory will be configured as an external IDP in AWS IAM Identity Center (successor to AWS SSO). IAM Identity Center supports automatic provisioning (synchronization) of user and group information from Azure AD into IAM Identity Center using the System for Cross-domain Identity Management (SCIM) v2.0 protocol.
Then, the domains in Sagemaker Studio will be created using Standard Setup so that relevant groups of users can be assigned. The users will be able to see only those Sagemaker SSO domain apps to which they have been assigned. This will establish domain-level isolation.

The domain tile shown above will create a unique user profile and will launch a JupyterServer application using it. So, each such application will have an isolated Amazon EFS directory. Every time same user profile will be used for that user. Hence, users will not be able to view/edit other’s resources. For sharing notebooks or models, Git or Sagemaker studio functionality will be used.

Every user profile can be assigned an execution role that performs operations on the user’s behalf on the AWS hardware that is managed by SageMaker. This execution role can be used to restrict access to a specific S3 bucket or to restrict the creation of some large instance types. Two such policies have been attached to this document.
One option is using the Sagemaker role wizard to restrict carious ML activities. It provides 3 personas templates that can be customized as per needs. Those personas are: Data Scientist, MLOps, and Compute persona. Details are discussed later in this document. This execution role will have to be attached to every user profile manually once they have logged in.
Note:
Using SSO for logging in to the sagemaker resources should be the only way. Access to Sagemaker via console would need to be revoked. If a user has access to Sagemaker via the management console, he will be able to access everyone’s resources from there.
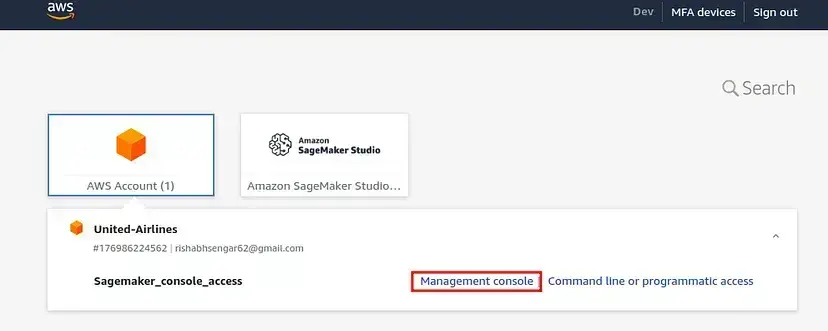
In order to give full access to a small cohort (admins), we can use permission sets in the IAM Identity canter to give sagemaker full access via console. For this, a permission set needs to be created in the AWS IAM Identity center with Sagemaker full access and assigned to relevant users in AWS organization. After the assignment, those users will see another tile as shown in the below screenshot. It will give them access to Sagemaker console.
User Personas
AWS Sagemaker role manager can be used to make roles for different personas. Amazon SageMaker Role Manager provides predefined permissions for the following ML activities:
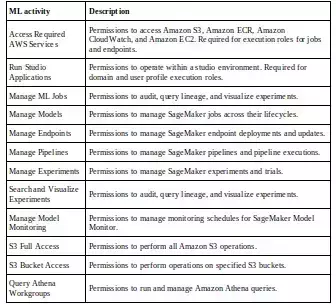
Amazon SageMaker Role Manager provides suggested permissions for 3 ML personas:
Data scientist persona
This persona includes the following preselected ML activities:
- Run Studio Application
- Manage ML Jobs
- Manage Models
- Manage Experiments
- Search and Visualize Experiments
- Amazon S3 Bucket Access
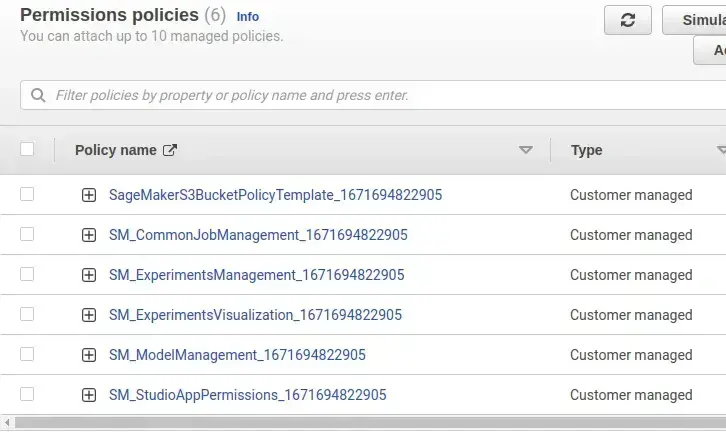
Policies attached in this role by default are –
MLOps persona
This persona includes the following preselected ML activities:
- Run Studio Application
- Manage Models
- Manage Endpoints
- Manage Pipelines
- Search and Visualize Experiments
Policies attached in this role by default are –
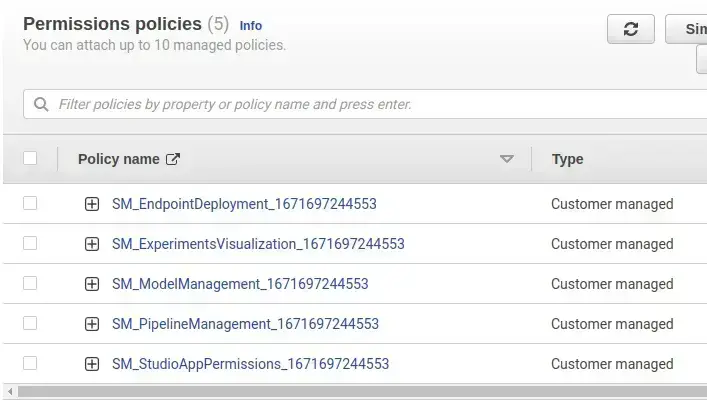
SageMaker compute persona
This persona includes the following preselected ML activity:
- Access Required AWS Services
Policies attached in this role by default are –

Policies JSON for the above personas can be found in sub-pages of this document.
Approach
Part 1: AWS SSO — Configure Azure Active Directory as external IDP
Step 1:
To configure the integration of AWS IAM Identity Center into Azure AD, first we need to add AWS IAM Identity Center (AWS SSO) from the gallery to the list of managed SaaS apps.
- Sign into the Azure portal using Microsoft account.
- Sign into the Azure portal using Microsoft account.
- Navigate to Enterprise Applications and then select All Applications.
- To add new application, select New application.
- In the Add from the gallery section, type AWS IAM Identity Center in the search box.

- Select AWS IAM Identity Center from results panel and then add the app. Wait a few seconds while the app is added to your tenant.
- Leave this tab open in your browser while proceeding to the next steps.
Step 2:
- Go to AWS SSO
- In the left navigation pane, choose Settings.
- On the Settings page, find Identity source, click on Actions pull-down menu, and select Change identity source.

- In the Service provider metadata section, find AWS SSO SAML metadata, select Download metadata file to download the metadata file and save it on your computer and use this metadata file to upload on Azure portal.
- Copy AWS access portal sign-in URL value, it will be used in below in point 5 step 3 to paste this value into the Sign on URL text box in the Basic SAML Configuration section in the Azure portal.
- Leave this tab open in your browser while proceeding to the next steps.
Step 3:
- In the Azure portal, on the AWS IAM Identity Center application integration page, find the Manage section and select single sign-on.
- On the Select a single sign-on method page, select SAML.
- On the Basic SAML Configuration section, Click Upload metadata file and upload the file downloaded in Step 2 (5th point).
- On the Set up single sign-on with SAML page, click the pencil icon for Basic SAML Configuration to edit the settings.
- In Basic SAML Configuration section paste values received from 6th point step 2.
- On the Set up single sign-on with SAML page, in the SAML Signing Certificate section, find Certificate (Base64) and select Download to download the certificate and save it on your computer.

- Return to the tab used in step 2 — the IAM identity center.
- In the Identity provider metadata section, select Choose file to upload the metadata file which you have downloaded from the Azure portal. (6th point Step 3)
- Choose Next: Review.
- In the text box, type ACCEPT to change the identity source.
- Click Change identity source.
Step 4:
- In AWS SSO, enable automatic provisioning.
- Get SCIM endpoints and token.
- In Azure portal, open application, go to provisioning, setup automatic provisioning using above endpoints.
Provision on-demand can also be used if addition of new users/groups is a rare occurance.
Part 2: Create groups of users to be assigned to same domain
Step 1:
- Go to Azure Active Directory, create groups for each team.
Step 2:
- Go to the Enterprise application created in part 1. Select Users and groups
Step 3:
Part 3: All domains to be created using standard setup
The domains to be created now needs to be created using Standard setup.
- In AWS Sagemaker when a domain is created, 2 options appear as:

- In the next screen, in Authentication choose AWS IAM Identity Center.
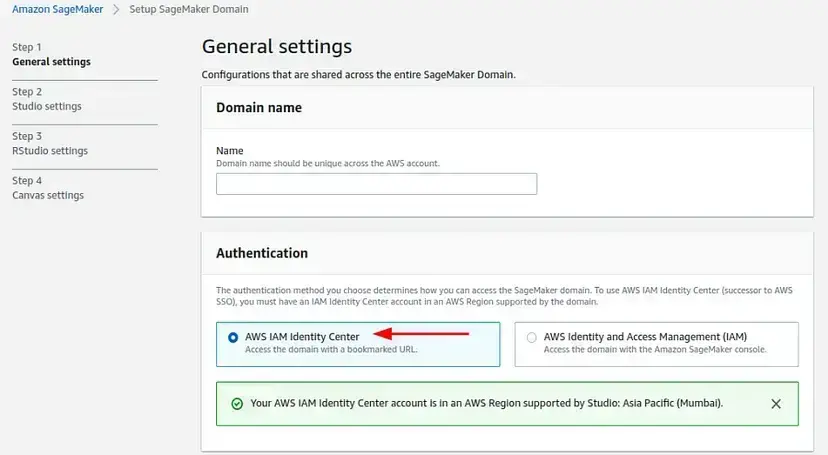
- In Permissions section, choose the default execution role. This default role can be the one created using Sagemaker Role manager.
- And remaining configurations will remain same.
Part 4: Give domain access to relevant users/groups
- In AWS Sagemaker, go to domain details and Groups section.

When the user logs into the IAM Identity Center portal, they see a tile for this Studio Domain. Choosing that tile logs them into Studio with their assigned user execution role. Every user will see tiles for only those domains to which they have been assigned.

Part 5: Create different user personas
As already discussed, custom user personas can be created or Sagemaker-provided personas can be used.
Part 6: Assign user persona to every user profile
Step 1:
- To assign IAM Identity Center users to your Studio Domain, choose Assign users and Groups in the Studio control panel. On the Assign users and groups screen select your data scientist user, and then choose Assign Users and Groups.
- After the user is added to the Studio control panel, choose the user to open the user details screen.
- On the User details screen, choose Edit.
- On the Edit user profile screen, under General settings, modify the Default execution role to match the user execution role you’ve created for your data scientists.
- Choose Next through the rest of the settings pages and choose Submit to save your changes.
When the data scientist or other user logs into the IAM Identity Center portal, they see a tile for this Studio Domain. Choosing that tile logs them into Studio with their assigned user execution role.


